Showing posts with label Marshmallow Custom Roms. Show all posts

Universal Guide How To Enable zRAM / Swap in Any Custom Rom – MT65XX


What Is zRAM/Swap?
How to Enable zRAM / Swap in Any Custom Rom – MT65XX. zRAM is a Linux kernel function that gives a form of virtual memory compressionzRAM increases overall performance by way of keeping off paging to disk and the usage of a compressed block device in RAM instead, inside which paging takes area until it is essential to apply the swap area on a hard disk drive. since using zRAM is an alternative way to provide swapping on RAM, zRAM allows Linux to make a better use of RAM when swapping/paging is needed, specifically on older Devices with much less RAM installed.
Requirements :- 
  • PC
  • Text Editor :-  CLICK HERE
  • tiny*** files :- CLICK HERE
  • Knowledge about unpacking and repacking boot.img
Procedure :- 
1. Download these 4 tiny*** files :- CLICK HERE and Extract it you will get following 4 files listed below-
tiny_mkswap
tiny_swapoff
tiny_swapon
tiny_switch
2. Now Copy these files and paste in a Folder.
3. Extract the Rom(in which do you want to enable swap or zram)
4. Now go to System – Bin folder and paste those four files here (all tiny** files)
5. Unpack the boot.img and go to initrd or Ramdisk folder :-
6. See if there is any enableswap.sh file?
7. If yes, then NO need to do or edit anything in boot.im
8. If no, Download this zip file :- CLICK HERE
9. You will see these two following files listed Below :
  • enableswap.sh
  • init.rc file
10. Now copy enableswap.sh and paste in ramdisk folder.

Now open init.rc file you've downloaded in step 9 and copy all Lines –

1. If your rom is Kitkat/Kitkat based (4.4.x) :- 
  • Open init.rc (in ramdisk) with Notepad++ and paste in bottom. and Save it.
  • Repack the boot.img and replace it with your existing boot.img.
  • Zip the Rom And Flash it

2. If your Rom is Lollipop/Lollipop Based (5.x.x) :-
  • Open init.mt65xx.rc (in ramdisk) with Notepad++ and paste in bottom and Save it.
  • Repack the boot.img and replace it with your existing boot.img..zip the Rom And Flash it

3. your rom is Marshmallow or Nougat (6.x.x or 7.x.x) :- 
  • Open init.mt65xx_common.rc (in ramdisk or initrd folder) with Notepad++ and paste in bottom and Save it( if init.mt65xx_common.rc is not available, Paste it in init.mt65xx.rc)
  • Repack the boot.img and replace it with your existing boot.img..zip the Rom And Flash it

Note:- Using This Guide You can enable only 512MB zRam
If you have any queries about this guide, comment below.

Screenshot :- 

Add VoLTE Feature in Non-VoLTE Mediatek OEM Custom Roms


So, Many users of custom roms users reported to have broken volte or volte not working while on roaming. 
There was a workaround to turn off/on radio from engineering mode but it only lasted till a reboot.
After looking into the matter last night i found the feasible permanent solution for it. It'll be little long so bear with me.

After fiddling with every firmware and custom rom i found out the cause of volte breakdown was the IMS status being not registered for some reason. You guys can check in IMS status option in 3 dot menu inside the engineering mode(*#*#4636#*#*). IMS services are responsible for calling and sms services over lte network.

Soo, Here is Small tutorial for all peoples who are Custom Rom on their devices and facing VoLTE issue...
This method works in few mtk OEM Roms and not all.

Tested in:
Pixel Ui mm
Condor A8 stock rom

Method 1: (preferred)

1. Unpack the Rom
2. Do normal porting
3. Apply Volte patch1 and patch2 (no need of egl folders) {Replace those files inside patch from ur stock Rom}


Method 2: (not recommended sometimes cause  rom to become totally unstable or may not boot up)

Copy all “files” in bin, lib, lib64 and paste in respective Port rom folder but Don’t replace existing files. This is to add missing files responsible for VoLTE/network

Next apply patch 1 and 2, mentioned in Method 1

Buildprop:

1. Delete unnecessary lines like cdma in case your stock rom doesn’t have those lines
2. Add all lines related to ims and VoLTE from stock/any VoLTE rom

Bootimg:

1. Edit it as per stock/any VoLTE Rom’s bootimg
2. Add modem, VoLTE, mal files in case if its present in stock
3. Zip everything and flash the Rom
4. Let it bootup

ImsService app:

1. Make a flashable zip of ImsService in system/priv-app/ImsService from stock or any other Rom

2. Flash it after Roms boots up.

You may add it directly in Rom but some cases Rom will get stuck in bootanimation.

In case one ImsService app doesn’t work try replacing from different Roms

How To Fix VoLTE Not Working In Mediatek Custom Rom MT6753/35/35M/37/37M


How To Fix VoLTE Not Working After Porting In Mediatek Custom Rom
Many of you might face VoLTE Not Working After Porting a Custom Rom. So here is a quick fix for it.
Caution: I am NOT responsible for any
damage caused to your device. Flash at
your own Risk!
Volte fix for Custom ROMs
Edit boot.img and build prop according to stock or latest MultiROM
Replace files from ur stock ROM and flash
Note:
First only flash patch 1 if it does not fix VoLTE in mtk custom rom than try patch 2
Before applying patch make necessary edits in buildprop and bootimg

Patch 1:

Only Flash Patch 2 if Patch 1 did not work.

Patch 2:

Note:
1. Only OEM ROMs support volte eg. Miui, VibeUi, ZenUi, etc
2. No VoLTE in compiled ROMs for mtk

Caution: I am NOT responsible for any damage caused to your device. Flash at your own Risk!

HOW TO PORT LINEAGE OS 14.1 BASED ROM FOR MEDIATEK MT6580 MARSHMALLOW BASED USING PC


How To Port Cyanogenmod 14.1/Lineage OS 14.1 Based Rom For MediaTek MT6580 Android 6.0.1 Marshmallow 3.18.19 Kernel
This Guide is Working for All CM14.1/LOS 14.1 Nougat Based To MediaTek MT6580 Android 6.0.1 Marshmallow 3.18.19 Kernel Based.
 Requirement : 
1. 7-Zip/Winrar
2. MTKbootimg or Carliv Image Kitchen (PC Version)
3. Notepad++
4. Stock Rom (Backup or Downloaded)
5. Custom Rom (For Same Chipset & Kernel)
6. Some Brain

Guide :

This Guide is only for MT6580 To MT6580 Same Based. If you Download Any Lineage OS 13/Lineage OS 14.1 Based Custom Rom For MT6582 Android 5.0 Lollipop 3.10.54 Kernel Based. Then This Guide Will work Perfectly. This Guide is not For Cross Porting roms for mediatek devices.

1 :  Make Two Folder and Rename ‘Stock’ and ‘port’.

2 :  Extract Stock Rom ‘Stock’ Folder and CM/LOS Based Rom ‘Port’ Folder
3 :  Go To META-INF/com/google/android/updater-script. And using Notepad++ make following changes to it.
* system=mmcblk0pxx to your device mount point
cache=mmcblk0pxx to your device mount point
data=mmcblk0pxx to your device mount point

[Note : If any mount point is not available then skip this step]


 4 :  Replace Stock To Port Folder


#From “etc” Folder
* system/etc/bluetooth (Whole Folder)
* system/etc/firmware (Whole Folder)
* system/etc/mddb (Whole Folder)
* system/etc/wifi (Whole Folder)
* system/etc/apns-conf.xml
* system/etc/spn-conf.xml

#From “lib” Folder
* system/lib/hw/sensors.mt6580.so
* system/lib/hw/lights.mt6580.so
* system/lib/hw/audio.primary.default.so
* systm/lib/hw/audio.primary.mt6580.so
* system/lib/audio.primary.default.so
* system/lib/libcamalgo.so
* system/lib/camdrv.so
* system/lib/cameracustom.so
* system/lib/libMail.so

5 :   Open build.prop File Using Notepad++ and make changes to it according to Stock.
* ro.product.brand=
* ro.product.name=
* ro.product.manufacturer=
* ro.build.product=
* ro.product.model=
* ro.product.device=
* ro.sf.lcd_density=320 (Your Device Density)
* ro.sf.hwrotation=0 (Your Device Rotation Angle 0, 180 or others)

[Note : In build.prop dont make any changes to lines you dont know about.]

 6 :  Port “boot.img” Using PC
 Method 01 :  Using MTKbootimg Tools
* Unpack Stock & Port “boot.img”
* kernel (Replace Stock To Port)
* initrd/fstab.mt67xx (replace stock to port)
* initrd/init.mt67xx (compare stock to port)
* Repack Port “boot.img” & Rename “boot-new.img” To “boot.img”
* Copy & Past Ported boot.img Port Folder

 Method 02 :  Using Carliv Image Kitchen
* Unpack Stock & Port “boot.img”
* boot.img*** (Replace Stock To Port)
* ramdisk/fstab.mt67xx (replace stock to port)
* ramdisk/init.mt67xx (compare stock to port)
* Repack Port “boot.img” & Rename “boot.img”
* Copy & Past Ported boot.img Port Folder

7 :  Make Zip File Using Winrar/7-zip & Copy Ported Rom SD Card' root & Flash it Using Philz Touch or Twrp Recovery.

How To Cross Port Marshmallow Custom Rom (MT6592-82-72/MT6735M)


HOW TO CROSS PORTING GUIDE MARSHMALLOW(MT6592-82-72/MT6735M)

REQUIREMENTS-

LIMITATION-
1.The rom you want to port must be same kernel version.
2.Always take a backup of your Stock rom.
3.Read careful,dont misplaced any file.

START-

1. Modify Mount points from stock rom to port.(mt6582\META-INF\com\google\android\updater-script)
2. copy these files from stock(mt6572) paste to port(mt6582) and rename as lik that...
-system/lib/hw/hwcomposer.mt6572.so to system/lib/hw/hwcomposer.mt6582.so
-system/lib/hw/gralloc.mt6572.so to system/lib/hw/gralloc.mt6582.so
3. Copy these files from stock to port...
-system/lib/libmali.so
-system/etc/firmware/
4. PORT boot.img
unpack both images using carliv image kitchen and replace all files except ramdisk folder from stock to port.

then open ramdisk folder and replace a file named ueventd.rc from stockboot.img to portboot.img
Done with boot.img,unpack it...

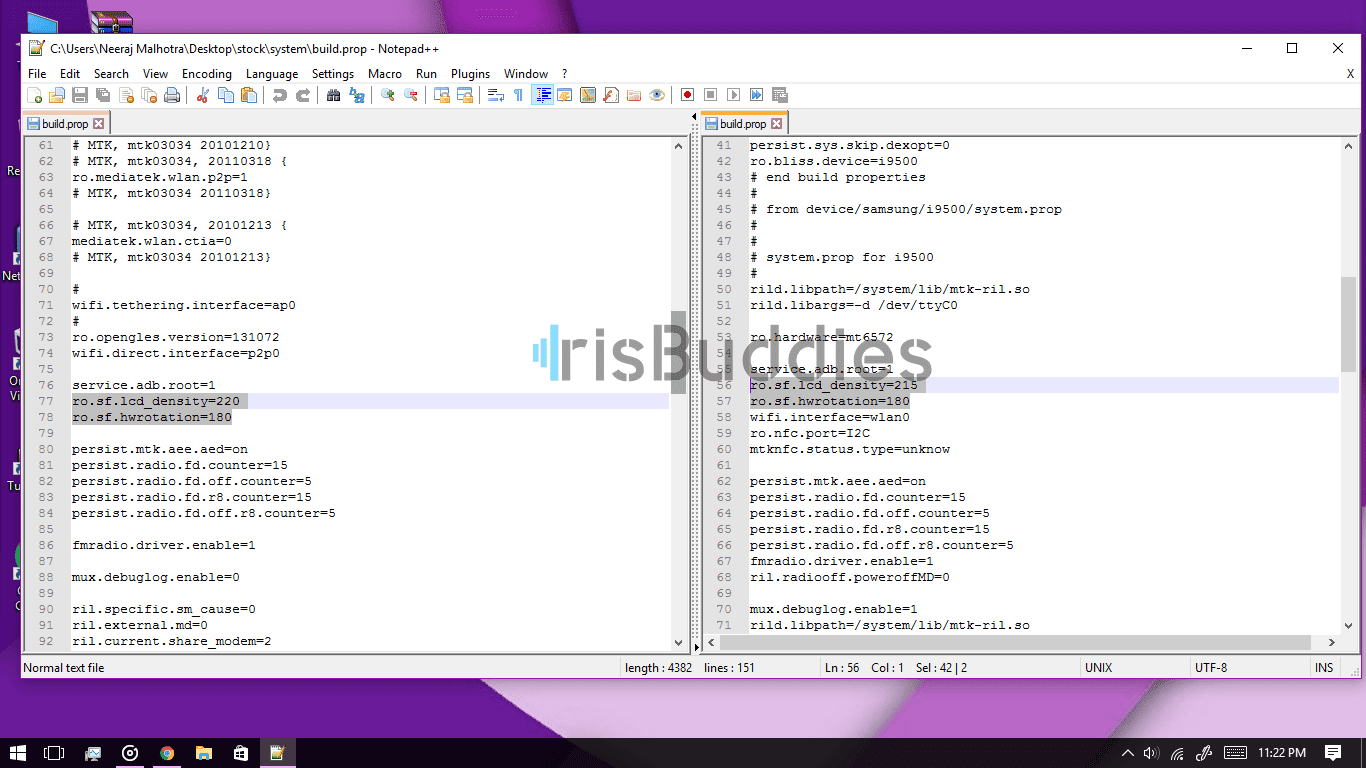
5. Edit build.prop
compare density and hw rotation see screenshot

DONE! REPACK ROM AND FLASH... 
this is the 100% fail safe method for porting rom,this not gives bugless rom...
you need to fix bugs yourself or i will explain bug fixing in next guide...


[ROM][6.0.1] CyanogenMod 13 Snapshot Build for Micromax Canvas Nitro A311/A310


Cyanogenmod 13 for Micromax Canvas Nitro A311/A310

Features
Dual SIM
Wifi
Bluetooth
Audio
Sensors
Camera (photo and video recording)
GPS (works only in online mode)
FMRadio

Bugs
-VPN
-GPS not works in device only mode
-Cant's switch between 3g/2g on sim1

Screenshots


Download
PORT FROM LATEST CM 13 SNAPSHOT BUILD
ROM  -    http://ouo.io/Uf6m5h

A310 Patch  -  http://ouo.io/kkQcpG

PORT FROM LATEST FIRE855 BUILD
ROM  -  http://ouo.io/kOAEt0

A310 Patch   -   http://ouo.io/NLybyP

COMPILED FROM SOURCE
ROM - r52 - MOB30R  -  http://ouo.io/37LvqLo

A310 Patch - r52 - MOB30R
http://ouo.io/0lBN0g

Installation Instructions
- Download the ROM
- Download the Gapps from www.opengapps.org (Select ARM - 6.0 - Pico)
- Put the downloaded zip files on your SDCard
- Reboot in Recovery
- Wipe System, Cache, Dalvik Cache, Internal and Data Partition
- Format Data partition
- Go to Mount settings (untick on data, system, cache partition)
- Install CM13 zip file
- Immediately flash gapps after flashing ROM (do no reboot in between)
- Reboot system
- For A310 users, again reboot to recovery and flash A310 patch
Enjoy CyanogenMod 13 .

Credits

fire855
ferhung
Axet
chrmhoffmann
DerTeufel1980
Al3XKOoL
kashifmin
Santhosh M
ariafan
hyperion70
Rohan Taneja
thp1997 - Nitro Device Tree and Vendor Tree
Arnob Porosh
Ajit Guraya (www.mtkroms.com)
CyanogenMod Team
addictz10
Jernell Festijo Gregario
Vikrant Arya
Sprout Dev Team
Surajlad9

XDA: DevDB Information
CyanogenMod 13 for Micromax Nitro A311/A310

Contributors
@bravonova

ROM OS Version: 6.0.x Marshmallow
ROM Kernel: Linux 3.4.x
Based On: CyanogenMod

Version Information
Status: Beta


FAQ:
Sim Network issues? Read this:
http://forum.xda-developers.com/show...&postcount=423

YouTube HD Playback
Newer youtube app versions have broken video quality detection. For fixing that problem you need to use a older youtube version. This version is working: http://www.apkmirror.com/apk/google-...-apk-download/

Second Method

To fix HD Videos on Youtube all we have to do is: 

Thanks to : Typhus_

Install Latest Youtube App
Open it and see any video (one you know it should be 1080p available but it's stuck at 360p)
Navigate to /data/data/com.google.android.youtube/shared_prefs (use any explorer with root permission)
Open youtube.xml

Find:
Code:
<boolean name="h264_main_profile_supported6.0.1" value="false" />

Replace to:
Code:
<boolean name="h264_main_profile_supported6.0.1" value="true" />
Save the file

Enjoy!

VPN
thanks to nervehammer
Follow these step to enjoy VPN in cm builds ..
1. Go to psiphon and choose Browser-Only mode don't tunnel whole device.
2. Go to its logs tab and check the port of http proxy.
3. Now open WiFi setting and long press to your WiFi network (from which u are connected) go to modify tab and from check the advanced options.
4. Chosen manual proxy option and put host name as 127.0.0.1 and port as the no. which you noted in step 2 (eg. 8080) and click save .

Enjoy you have set up a VPN connection successfully.
You can open your browser and check your IP 

Note: You have to undo this after you don't need VPN by changing manual proxy to none .


For those who want to use Orbot vpn
This is very similar to previous vpn workaround for psiphon
Just follow these step for Orbot 
1. Open Orbot and long press to start orbot.
2. When all bootstrapped done go to check browser it will ask for normal browser or install Orweb .
3. Open Orweb and volla you r connected to tor but actually its not to tunnel your traffic to vpn go to Orweb settings.
4. Now note the proxy host and proxy port generally it is localhost(same as 127.0.0.1) and 8118 respectively but it may change so better to keep updated with port numbers.
5. Now go to wifi setting and long press the wifi (from which u r connected) and check advanced options.
6. Choose manual proxy option and put the host name 127.0.0.1 and port no. (e.g. 8118 ) which u noted in step 4

Now u can check https://check.torproject.org from any browser and volla Congo this browser is configured to use tor.
Sorry for long guide but it is detail enough so that anyone can easily setup tor in cm builds.

Note: You have to undo manual proxy option to none after you don't use vpn.


[AOSP][STABLE][ROM] Slim6 V1.3 - MT6582

> SlimRoms is a custom android operating system. Our main goal is to offer users a slimmed down yet feature rich alternative to other android operating systems.
The entire SlimTeam work together to bring you this tailor-made beauty straight from Android Open Source Project (AOSP) source code.
All of the sources can be publicly viewed through GitHub and you can stop by our public Gerrit to submit patches of any type.

> Slim6 is the project name for SlimRoms based on Android 6.0.1 Marshmallow and offers the following original features:

  • Slim Navbar & Hardware key rebinding
    • ​Single tap action,​​ ​long press action, double tap action!-We’ve got you covered.
  • Slim Actions & Chamber of secrets
    • ​Customise your device to the fullest​​ ​-You’re a wizard!
  • SlimRecents
    • A Faster alternative to stock recents ​-Your device, your choice.
  • SlimLauncher
    • ​An​ ​Open​ ​source,​ ​feature​ ​filled​ ​launcher!​​ ​-Make yourself at home
  • Status bar customizations
    • ​Clock and Date? Battery? ​-More​ ​fun​ ​than​ ​you​ ​can​ ​shake​ ​a​ ​stick​ ​at


Bugs :-
> VPN , Switch
Note :-  Micromax Unite 2 users can directly Flash it.
Downloads :-

ROM :-  Slim6 v1.3
A106 SD default patch :- No Emulated Patch
BT Fix :- BT fix patch
Gapps :- opengapps.org (use ARM/6.0)

Credits :-
> Tirth Patel (compiled from Source for 82)
> Ranjan Singh (for Porting and Bug Fixing)
> #AURA
> SlimRoms Team
> TLS
>ferhung
> fire855


Disable_Adblock

We know Ads suck, but at IrisBuddies we will not let them do that
As blocking is a good idea to get rid of stupid “Download Now” Buttons around the web
That’s not in our case. We think you won't find Ads on Our site terrible or annoying
Support us by Whitelisting “IrisBuddies” on your Adblocking Plugin or By disabling your AdBlocking software

If you think this is not good and we should allow AdBlocking Plugins
then Please Contact Us or write us on our Facebook Page
and we might allow it in near future.