How to port qualcomm snapdragon roms without pc
This article covers all the essential steps required to port custom roms for qualcomm snapdragon chipsets without PC. Please note that this article only cover porting roms not building roms from source and building roms without pc is currently impossible and steps listed below only explains system and kernel editing not full guide to port roms because some files vary in different devices. Let’s start with identifying the terms!
Requirements-
1. Mkbootimg tool - Download
Procedure -
1. Make two folder base and port. The base one is from your device(base) rom and port one is for the rom you want to port.
2. Download both the port and base rom of same android version and extract them to their corresponding folders.
5. Install the sdat2img.zip through TWRP recovery and make sure that your system has 70mb of free space
6. Convert the both system_new.dat one by one to system.img by running this command through terminal emulator:-
Cd system.img location sdat2img
In system_new.dat location type where you stored your base and port rom system_new.dat
7. Now both system_new.dat has been converted to system.img
8. Extract the system.img by this command:-
9. Both the system.img has been exacted now replace the files as needed.mkdir system
mount -t ext4 -o loop system.img system
cp -rf system system2
Unpacking boot.img
1. Flash the mkbootimg_tools.zip through twrp
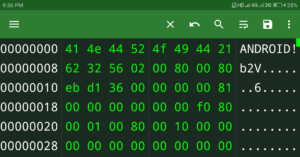
2. Install hex editor from play store
3. Open the hex editor then open boot.img and delete every thing before android!. Do the same for the another one also. After removing it should look like this
4. Place both the boot.img to data/local/tmp
5. Open terminal emulator and run this command:-
6. For base boot.img:-cd /data/local/tmp
7. For port:-cd /base
unmkbootimg -i boot.img
cd /port
unmkbootimg -i boot.img
Extracting the ramdisk
8. Create a folder for ramdisk by running:-
9. Run this to extract ramdisk:-mkdir ramdisk
gunzip -c ../ramdisk.cpio.gz | cpio -i
10. Now let’s repack the ramdisk by running:-
Cd ..
mkbootfs ./ramdisk | gzip > myramdisk.gz
Rename the myramdisk.gz to ramdisk.gz
Then copy and replace it with the one on your base kernel folder
Repacking the kernel
1. To repack first run cd command and go to data/local/tmp/base then run this command in terminal emulator:-
mkbootimg –base 0 –pagesize 2048 –kernel_offset 0x80408000 –ramdisk_offset 0x81808000 –second_offset 0x81300000 –tags_offset 0x80400100 –cmdline ‘console=ttyHSL0,115200,n8 user_debug=31’ –kernel kernel –ramdisk ramdisk.cpio.gz -o boot.img
The boot.img has been repacked now copy the boot.img to the ported rom folder and paste it and repack the rom.
Congrats you have ported your own rom without pc!
Credits:-
Modding.mymind(XDA) for mkbootimg tools.
RendyAK(XDA) for sdat2img.
RendyAK(XDA) for sdat2img.


0 comments: