

Enhance Your Web Browsing Experience Using Android Chrome Flags - Hidden Settings

Google Chrome has enough features to make it one of the best browsers available both Android and Desktop, but did you know there is more than what you see? Chrome actually has a big list of hidden features that you can use to further improve your browsing experience. Chrome’s experimental features, also known as Chrome flags, are a list of Chrome features that aren’t finalized yet but are available for anyone to use.
These under-development features do have a tendency to backfire, though on most machines that we tested on they work fine. Below we have listed five Chrome flags that are worth using. If any of these features negatively affects your browsing, just undo the changes and everything will be fine.
How to Access Chrome Flags
Before you use any of these Chrome flags, you first need to know how to access them. Type
chrome://flags in the chrome address bar and hit Enter. You will see a big list of Chrome Flags with a warning that these features are not stable.
Here you can use Chrome’s “Find” (Ctrl+F) feature to quickly find the features we have listed below. I will also be adding a URL at the end of each feature that you can directly paste in the Chrome address bar to access that feature without going through the above process.
1. Enable Smooth Scrolling
As the name suggests, this lets you smoothly scroll through the content. If you haven’t noticed, when you scroll in Chrome using your mouse or the arrow keys, there is a little stuttering in the animation. In my experience this makes it hard to quickly go through content and also easily read what is important at the same time (bad for content skimmers). With this option enabled, smooth scrolling just feels right and professional.
Just search for “Smooth Scrolling,” or you can type
chrome://flags/#smooth-scrolling in the address bar to directly access it. Enable it using the drop-down menu below it.
2. Quickly Mute Tabs
Chrome shows a tiny speaker icon on the right side of the tabs that have audio playing inside. This enables you to quickly find the source of the audio and mute or stop it. By enabling this Chrome flag, the speaker icon will act as a mute button so you can click on it to quickly mute the tab without even moving to it. Of course you can right-click the tab and select “Mute tab” to mute it, but this is much faster without any distractions.
Look for the feature “Tab audio muting UI control,” or type
chrome://flags/#enable-tab-audio-muting to directly access it. Click on the “Enable” button below it to enable it.3. Enable Fast Tab/Window Close
When this flag is enabled all the tabs and windows you close will be closed instantly without any delay. This doesn’t mean that it lets you skip through the closing process. What it does is hide the tab immediately once it is closed. The closing process still continues in the background without you knowing it. This definitely speeds up your browsing experience even if isn’t actually speeding up anything. You can quickly close all the tabs you like and continue working while tabs close in the background without being a hurdle in your work.
Search for “Fast tab/window close,” or type
chrome://flags/#enable-fast-unload to directly access it. Click the “Enable” button below it.4. Enable Experimental QUIC protocol
QUIC protocol is a new connection protocol created by Google that is still under development. QUIC is supposed to be a mixture of TCP and UDP protocols that is much faster and secure at the same time. Usually when we are on a TCP or UDP connection, it takes multiple trips to the server before a connection is stable (which takes time) and ready to exchange data. QUIC protocol’s main goal is to only make a single trip to create a connection and start the data exchange process, thus increasing the overall browsing and data exchange speed.
In Chrome you can enable QUIC protocol to start taking advantage of this protocol right now and speed up browsing. Look for the flag “Experimental QUIC protocol,” or type
chrome://flags/#enable-quic to directly access it. Use the drop-down menu below it to enable it.5. Enable Password Generation
When this flag is enabled, Chrome will automatically generate a strong password for you when it detects you are on a sign-up page. This is a handy feature that will help you generate a strong password without any help of third-party tools. Search for “Password generation,” or type
chrome://flags/#enable-password-generation to directly access it. Enable it from the drop-down menu.6. Make Menu Button Draggable
This newest addition to Chrome Beta may be my favorite yet: Activating the experimental setting turns the overflow menu button -- the three vertical dots at the top-right of the screen -- into a swipeable command.
With the setting enabled, you can simply touch your finger to the icon and swipe down to access any of the functions within -- functions like opening a new tab or incognito tab, requesting desktop mode, finding text, or opening the browser's settings -- without having to lift your finger and tap again. It's a great idea that, once you've used it, just makes sense; I'm really hoping it'll make its way into the rest of Android eventually.
Search for “Enable Draggable menu button,” or type
chrome://flags/#enable-draggable-menu-button to directly access it. Click the “Enable” button below it.7. Show Autofill Predictions
Disabled by default, this flag will insert predicted text into text boxes for you. Not just for password anymore.Just search for “Show Auto-fill predictions,” or you can type
chrome://flags/#show-autofill-type-predictions in the address bar to directly access it. Enable it using the drop-down menu below it.8. Maximum tiles for interest area
In short, what you're doing is giving Chrome access to more memory, and eliminating that stutter you get when scrolling up and down pages. All you have to do is open a new Chrome tab on your Android device, and paste this in the address barchrome://flags/#max-tiles-for-interest-area Bump that up to 512.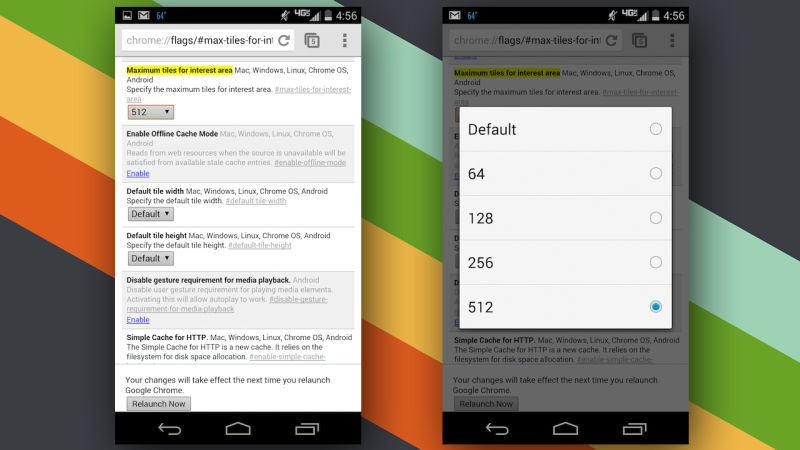
Giving Chrome access to more memory means Android will be more aggressive with closing other idle apps and such in order to make sure Chrome has all the food it needs; so you're on an older device or one with less built-in RAM, you may want to start with 256 (the default is actually 128) to find your sweet spot. 512 worked for us, though.
9. Enable offline auto-reload mode
Turn this off to prevent tabs from automatically reloading if the previously failed to load. Perhaps you were offline at the time. Requires you to manually reload the pages.Search for “Offline Auto-Reload Mode,” or type
chrome://flags/#enable-offline-auto-reload to directly access it. Click the “Disable” button below it.10. Disable click delay
Did you know that Chrome waits almost half a second sometimes before acting on your button clicks? That’s right, it delays so that you can trigger a double click action. If you never double click in your browser, go ahead and turn this guy on to speed up the click action.Look for the feature “Disable click delay,” or type
chrome://flags/#disable-click-delay to directly access it. Click on the “Enable” button below it to enable it.11. Disable the pull-to-refresh effect
Most people were excited to see pull-to-refresh in Chrome, if you were not, simply hit this to turn it off again.Search for “Disable the pull-to-refresh effect,” or type
chrome://flags/#disable-pull-to-refresh-effect to directly access it. Enable it from the drop-down menu.12. Enable Enhanced Bookmarks
Rather, disable this one to turn off Google’s new bookmark manager. I mean, you might like the new tool, but those of us that dislike it, dislike it with a passion.Look for the feature “Enable Enhanced Bookmarks,” or type
chrome://flags/#enhanced-bookmarks-experiment to directly access it. Click on the “Enable” button below it to enable it.13. Password and account settings.
Truth is, there are a few flags that deal with passwords, credential managers and related that might be fun to play with, however, as there is no guarantee that these flags will not expose all of your passwords to the internet, I will not recommend any of them. Please take precautions.14. Move URL Bar to Bottom
If you’re looking for a way to move the URL bar to the bottom of the screen instead of the top position like in iPhones, then this option can help you with that.Although this option is only available in Canary version of chrome android. So if you want it then install “Chrome Canary” on your Android phone and then open it up to get started. You will see the interface of Chrome Canary is almost similar to the native Chrome app.
Now, what you have to do is Look for the feature “Chrome Home,” or type
chrome://flags/#enable-chrome-home to directly access it. Click on the “Enable” button below it to enable it.
15. Reader mode
Reader mode comes in very handy when you land on a site that's particularly challenging to read on a mobile device. The "reader" mode will shed all the unnecessary items and present to you the text and only the text (unless their are inline images, which will still appear).Search for “Enable Reader Mode Toolbar Icon,” or type
chrome://flags/#enable-reader-mode-toolbar-icon to directly access it. Enable it from the drop-down menu.
16. Increase the “Raster Threads”
Raster graphics use pixels to form an image (as opposed to vector graphics, which use lines and curves). Virtually all websites use raster images, and raster threads are how a computer reads those images.This is a great hack, therefore, for anyone who suffers slow-loading images on pages they visit.Search for “Number of Raster Threads,” or type
chrome://flags/#num-raster-threads to directly access it and choose 4 from the drop-down list.
17. Low-Priority iFrames
An iFrame (short for Inline Frame) is used by web designers to insert content from another source within a site. In layman’s terms, it is like a webpage within a webpage. Too many iFrames on a website can dramatically impact a page’s loading time.
They are typically used for adverts, plugins, and other non-native content.
Enabling this feature will allow Chrome to ascertain what it believes to be the most important iFrames and load them first. Adverts and other non-essential content will be loaded after the rest of the page is already being displayed.
Look for the feature “Low Priority iFrames,” or type
chrome://flags/#low-priority-iframes to directly access it. Click on the “Enable” button below it to enable it.18. TCP Fast Open (Only Available on Chrome OS and Android)
TCP Fast Open (TFO) is an extension that speeds up the opening of data channels between two endpoints. Enabling this feature will allow data to start being sent/received more quickly.
It works by giving the browser a cryptographic cookie so it can re-authenticate itself before the traditional “three-way handshake” has been completed.
Search for “TCP Fast Open,” or type
chrome://flags/#enable-tcp-fast-open to directly access it. Enable it from the drop-down menu.19. “Stale-While-Revalidate” Cache Directive
“Stale-While-Revalidate” is a cache directive which tells the cache that a response can be served even if its max-age has expired (i.e. – it is “stale”).This is possible for up to five minutes – anything after that will result in a blocking fetch. However, for a period of 60 to 300 seconds, the browser will display the “stale” response and do a background update to refresh the resource.
Look for the feature “Enable the "stale-while-revalidate" cache directive,” or type
chrome://flags/#enable-stale-while-revalidate to directly access it. Click on the “Enable” button below it to enable it.Bonus
20. Enable Offline Mode (view saved copy)
In offline mode, Chrome will create a local cache of all the web pages you visit. If you visit any of these web pages again without an Internet connection, Chrome will let you load a previous copy of the web page from the cache.In Chrome you can enable Offline Mode to start taking advantage of this protocol right now and speed up browsing. Look for the flag “Enable show saved copy button,” or type
chrome://flags/#show-saved-copy to directly access it. Use the drop-down menu below it to enable it.You will see two ways to enable it: “Enable: Primary” and “Enable: Secondary.” According to the description, it says that “Enable: Primary” will put the button in the error page and “Enable: Secondary” will put the button next to the “Reload” button. However, in my case, “Enable: Primary” puts the button in the error page, and “Enable: Secondary” just turns that button from blue to gray (functions fine, though). I guess it’s a bug, but as long as the function stays the same, there is no problem.
Chrome will cache images, HTML content, JavaScript, CSS stylesheets and everything that doesn’t require an active Internet connection to work. The page should look almost the same as the original one. Although, content like active widgets and videos will not be loaded, and if the page ws updated from the last time you visited, the new updates will not be shown either.
Note: all the web pages are saved as “Internet Cache,” and if “Internet Cache” is deleted, all the stored data will also be deleted. A browser cleaning tool may delete “Internet Cache” in processing, so avoid using such a tool or uncheck Chrome “Internet Cache” from the cleaning list.
Bonus : 2
If you haven’t noticed this already, Chrome has a few of these Easter eggs tucked into the browser. On your Android device, try outchrome://version for a super detailed overview of your browser version. On your Android device or PC, try hitting chrome://chrome-urls to see the entire list of available browser pages.
Confirming and Undoing Your Changes
Confirm Changes: Whenever you change a Chrome flag, you’ll need to reboot your browser before the changes take effect.
Just click on the large Relaunch Now button at which pops up at the bottom of your screen. All the pages you currently have open will be automatically reloaded, though we recommend that you save any work before proceeding.
Reset Settings to default: If you find that you’ve broken something but you’re not sure which setting caused the problem, you can easily restore all the flags to their default settings. Look for the Reset All To Default option in the top right-hand corner of the menu. Click it, and restart your browser.
Conclusion
Above are a few of the useful Chrome flags that should enhance your browsing experience. Although there are dozens of other flags to try out, we do not recommend you mess with them unless you know exactly what you are doing. These experiments can prevent you from browsing normally and may even lead to data loss, so be very careful and only enable what we have mentioned above.If any of these recommended flags had a negative impact on your browsing, do share it in the comments below to help other users.
Share story


0 comments: